Wednesday 29 April 2009

You and your Tennant Suit

As well as covering the making of my own suit, I’d like to extend an invitation to anyone reading to share their own Tennant Suit with us and tell everyone how you came by it and what you like about it the most.

I am not looking to find out who has the most screen accurate suit: you could have got yours from one of the online sellers; made it yourself, or had a seamstress or family member help you; maybe you found it off the peg on a high street and it is reminiscent of the real thing; you could have even found it in a charity or thrift store - what this is about is your suit and how good you feel wearing it.
Have you ever worn it to a work meeting where no-one but you knows what the suit represents?
There will be no final rating or comparison between owners, so do not worry that you will be judged on anything other than how much you enjoy owning your suit!

If you are interested in sharing your suit on my blog, please get in touch by emailing me at tennantcoat@me.com.

I am drawing up a list of standard questions which I will send back to you to answer. Feel free to also relay any other comments or anecdotes you would like to share with everyone.
I would ask that you send some photographs, or give me a link to an online gallery where I can find some that I can use. You will be given full approval of a draft of the blog before it goes live, and if you wish, can remain anonymous.

Sunday 26 April 2009

Comparing fabrics

UPDATE ONE:
I recently met a Baron’s suit owner who’s suit is made from a new fabric. (You can see a report on the suit under Ten to the power of Two.) I have added this below in comparison to the swatch sample I was sent in 2008. 
UPDATE TWO:
I recently acquired a  swatch from what I believe is THE trousers on which the Tennant Suit is based. This is therefore the target for all other matches.
You can read more about it in Revelation Of The Trousers, and below is how the fabric measures up so you can compare it with the fabrics used for the replica suits below.

GAP trouser fabric - believed to be the fabric
Type of fabric: 100% cotton (according to label)
Fabric weight: Lightweight
Colour of fabric: Chocolate brown/beige (approx 70%/30% mix)
Colour of pinstripes: Cornflower blue
Width of pinstripes (in threads & mm): 5 threads - 1mm
Pinstripe repeat: 11.5mm


To fill a little time before I get stuck into my suit, I thought it worthwhile to take a step back and look at the fabrics used to make Tennant suits by some of the professional replica costume makers, as well as the fabric I will be utilizing for my own suit.

Most of the below is based on what I have observed in the fabrics I have been able to lay my hands on. If you have any additional information, please feel free to get in touch so I can revise appropriately.
To calculate the pinstripe spacings as accurately as possible, I measured 10 stripes and averaged the result, hence the very precise figures!

I have done my best to get the images as close to the original fabrics as possible, and relative to each other, so I believe this is a pretty fair visual comparison, though it may depend on your monitor, so please do not take this as the definitive colour match.
So, in the order they came on the scene, or to prominence, looking just at the fabric and not at the merits of the suits themselves or how they are made, here they are.

Monday 20 April 2009

Notes on a suit

While I am a little distracted with some work on my new Tennant coat, I thought I would share with you all some thoughts and comments on the suit from a follower of this blog, Seth.

Seth is a third year apparel design student who drafts his own patterns. He has just revised his Tennant Suit pattern and is now half way through the drafting of his Coat.

He is the owner of a Magnoli suit or three, all he reports, being slightly different from each other!

Being a trained pattern cutter, it was inevitable that he would attempt to deconstruct and then reconstruct one of his suits, where possible putting right the errors and inaccuracies down to the last detail.
I would like to thank Seth for his input for my blog. 
I will be referring to his notes when I cut my pattern. Finally, I would also like to thank him for agreeing to let me publish them.
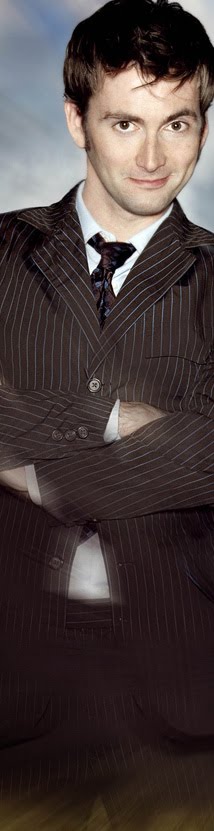
All the pictures on the left are Seth’s adapted suit, and those on the right are my own un-altered Magnoli suit.

The problems he encountered and solved were:

COLLAR AND LAPELS
Straightening the Collar points and Lapels to follow the pinstripes.
Seth noticed on Tennant’s suit that the Collar points are a tad bit longer than the Lapels. He cut his to 1 3/4 inches for the Collar point extensions and 1 1/2inches for the Lapels extension.


For Series 3, he also noticed that Louise Page (the costume designer) no longer followed the pinstripes on the Collar extension, as the pinstripes noticably trail off and are interrupted by a more “steep” extension. This has carried through to Series 4. Seth personally prefers the cut of the original Series 2 Collar.

BOX PLEAT POCKET
Moving and re-sizing the Box-Patch Pleat Pocket on the front of the suit.
Seth found the Patch Pleat was a real problem. He was stuck with the Suit rations in the form of button placement, side pocket openings and lapel slants. Tennant’s suit is actually on the long side.

Seth ensured that it sat 1/4 inch away from the slant lapel and 1/2 inch above second buttonhole (his buttonholes being spaced 3 1/4 inch apart). The bottom of the flap sits right above the top of the first button at around a 1/4 inch.

He reconstructed the Box-Patch Pleat Pocket to a 4 inch width. The Curved Flap measuring 2 inches long, sewn off a 1/4 inch at the top, with a Curved rise of 1/4 inch. The overall height by width when sewn on the jacket worked out to be 5 3/4 inches high by 4 inches wide.

BACK VENT
Heightening the vent openning on the back and lowering the Back-Belt.
The Back-Belt needed to be lowered as it was sitting exactly at middle back.

His vent now sits at 9 3/4 inches and like Tennants Suit, the Vent begins at the bottom of the Back-Belt, which is at a 2 inch width.


Wednesday 1 April 2009

Back yet again

Just a quick update on the suit progress today.

I cut and made the back and fronts of the suit for the moleskin version last weekend.

I am basing my pattern on a dissected old Honest Dragon suit I bought ages ago. The suit wasn't up to much, so it a cheap sacrifice to get a decent pattern for my own version.

I am trying to keep things as simple as possible, so am only changing the pattern as and when inaccuracies are found, or where the suit failed to fit badly, which it did often!

The back of the suit is relatively easy, and did not require much in the way of recutting. Seen above I am about to cut the material for the back. The extra bits at the bottom are used to make the vent in the back.

I took measurements of the back belt from the Honest Dragon suit, and compared them to various photographs to ascertain how many pinstripes it should ideally cover (five). I then cut a pattern for it based on what I had found.
The belt was cut in moleskin, interfaced with iron-on interfacing and the long edges folded and pressed to make it to the right size (as seen here).

I then carefully pinned it to the sewn back, just above the split, being careful to keep things nice and square. When I top-stitched it into place, I made sure I didn’t catch the back vent fabric in with the belt, as I would need to attach the lining to it later.